Greetings!
As you have surely noticed I haven’t been really active here in my lovely blog. Mostly this is due to a lack of energy and having to endure temperatures of almost up to 40°C here in Berlin. Summer has been and always will be a pain in my hobbyist ass. None the less it is cooler, I am getting more and more motivated to get shit done and thus I have decided to initiate a themed month (more 4 to 5 weeks) where I will focus on one game and one faction thereof.
The game is, of course, Malifaux and the faction will be… Gremlins. Thus I dub thee:
GREMLIN MONTH
Gremlin month will probably ‘officially’ start this coming weekend, where I will begin to paint as many models as I can that I own of the Gremlins (to this point all but 2 models…). To guide me through this time and also finally enable me to finish a set of tutorials I had penned out, I will write up quick tutorial bits on how to basically finish one of my gremlin models. All of the materials and things I use, how I prepare, paint and look at models. How I even think and plot stuff around my models. Maybe even how I eat nachos and salsa! None the less this first post will be rather informal and just dive right in. The following posts to this set of tutorials will be a bit more structured and also be linked to previous and following posts, to enable those of you who may be reading this out of order to catch up on other steps you may be interested in. Let’s go!
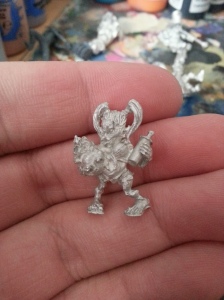
The model I will use for this guide series is a Malifaux Gremlinette. A special edition model (basically the first ‘Miss’ model, just not named that way) from way back hundreds of years ago.
This is a pewter model and pewter models need a bit of preparation before you slap some paint on there and have a field day.
In this image and the one above it you can clearly see mold lines on the miniature. These happen when the model is being poured. Usually two blocks are stacked onto each other, where a mold of the miniature is imprinted on. Sometimes these plates are not 100% perfectly aligned or pressed together and thus you may get some small mold lines, as seen on the legs especially on this model. This needs to be removed, otherwise you may have some really yucky looking lines running down your model that is all nice and painted up. Just use some files and file them gently away. Feel free to use different forms of files, in order to get into small and tight recesses or to prevent from detail loss in other areas. You can pick up files like this in many hobby stores or miniatures and local game stores.
Here’s the model all nice and filed up. One more thing has been done to this model before taking the picture though. Cleaning. It is important to clean off pewter models before priming and painting it. This is because when being poured into the mold, the mold is usually coated in an oily substance to better remove the miniature from the mold after hardening. This creates a slight film on the mini, which is usually nearly entirely gone from large spaces and areas you can easily touch on the model. The stuff does still lurk in some recesses and could potentially give you a bad day when the paint chips off because it could not stick to the metal as good as it should, due to the film. Grab an old toothbrush and some soap and give it a few good rubbings. Rinse with water and dry off well.
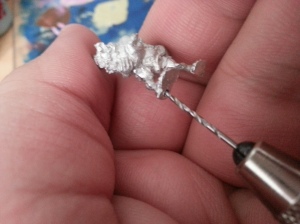
The next step is not really necessary on such a small scaled model, but I like to do it anyway. Pinning models to bases and also pining parts of models onto themselves to enable a more stable and securely glued model is a really good thing to pick up. Imagine your model topples over on the table and an arm, a head or even the entire miniature breaks off. You can prevent this a whole lot better by pinning the model. This gives more surface for the glue to harden on and thus keep it stuck to parts better than before. Often some minis will have little nobs that are basically there to function as little pins. It may suffice for you, it may not. I recommend pinning. What I do is drill a small hole in the area where I want the pin to go into. In this case I am going to pin the model (only one foot) to the base to help secure it on the cork plate I plan to have it stand on. Drill ever so gently, as you do not want to drill too far and poke out of an unwanted part of the model. Try to pick thicker areas where you can drill about 2-3 mm.
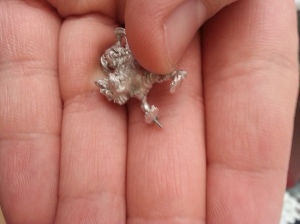
The final step for pinning is gluing the pin into the hole you drilled for it. I use paper clips to do this. A cheap and very accessible material to use that also nets you a lot of pins for many models to come. Glue in the pin and let the adhesive dry. Then use some pliers and cut the paper clip about 5 mm away from the base of the foot. This will give you a good amount of pin for the base. Some people also like to pin with much longer sections of paper clips and then fold the rest of the pin underneath the base. I only do this on exceptionally large and heavy miniatures. Once I get to another model that needs this, I will show it to you and possibly update this post.
That sums up these first steps of preparing the model to be painted. If you wish to continue reading my tutorial Click on the link below! With that have a nice day and see you next time.
Next step: EBM Guides: Preparing a swamp base for a miniature


Oooh, very informative! I look forward to this set of your posts as I have been trolling about trying to find someone that goes from start to finish with a single figure!!
Also, I look forward to your insights on how to correctly eat nachos. 🙂
Yeah. My little Gremlinette will strut her stuff and show off everything she has. I am still contemplating on how I do the painting steps. If I just go from color to color, or do bulk color sessions. Still have to plan it out a bit once I get to painting her.
The art of eating nachos is quite a complicated matter. Not everybody is proficient in eating nachos, nor do some people have the stuff what it takes! More soon!
Very nice and informative article; I think that this will be very helpful to people who are just starting out in this hobby. I look forward to seeing your great painting applied to a whole family of Gremlins.
Yeah. It is mostly aimed at those who may want a better start at the hobby or improve tid bits. I will try to relay as much information and experience as I can, so also more experienced hobbyists may pick up an idea or two from it. Just wanna help people. 😀
I look forward to my mob of gremlins as well. Glued and based 21 models yesterday. Pretty much everything is nearly ready for GREMLIN MONTH! Woop. 😀
Hi! Do you sell this miniature?
Regards
Sergio
No I do not have them for sale. 😦